 |
Playback level adjustment: A reference level is very important – among other things – for the Dolby circuits. This is done with the 400Hz level tape, and provides an accurate level reference to adjust the playback gain and the Dolby circuits. Measure signal at point of playback amp specified by the service manual. Adjust to obtain reference voltage. Some modern decks use a 1V playback reference value, while older models use 580mV at output terminals. Always check your service manual for details.
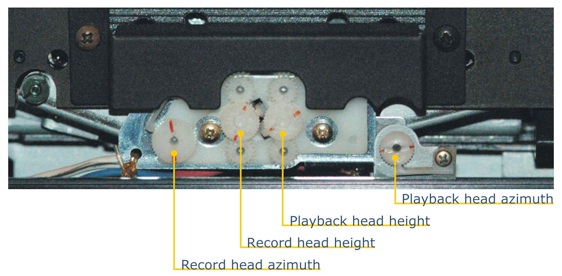
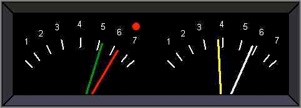
Playback head height: (not adjustable in all decks – for example 500 or 600 series) This adjusts the head heigh position with respect to the tape, making sure it is right on top of the tape’s recorded path. Start the Audio Level Meter (PPM) on the PC. Load and play the 1KHz tape. Adjust head height screw (refer to SM for details) until you get maximum levels on the meters (please be aware that, with the Nakamichi original track alignment tape, this adjustment should be minimum as referred to in the service manual!). Do the following: Turn the screw slowly (no more than +/- half a turn, otherwise you may be facing other severe mechanical problems!) until you get max green and red (L and R) readings (of aprox. same reading). When you think you are close, fine tune using the white and yellow needles. Look for maximum white and minimum yellow. If you get a lot of red / green difference and the needles don’t come close at maximum levels, your may need to repeat the playback level adjustment 😉
 |
|
| Green: Left Red: Right |
White: Sum Yellow: Difference |
Playback azimuth alignment: This adjustment rotates the head to make sure head is parallel to tape’s recorded path. Slight azimuth errors lead to poor high frequency response. Start the PPM (check input level, this is a -20dB signal!). Load and play the 15KHz tape. Adjust head azimuth screw – always refer to SM for details – until you get maximum levels on the meters. Do the following: Turn the screw slowly (no more than +/- half a turn, otherwise you may be facing other severe mechanical problems!) until you get max green and red (L and R) readings (of aprox. same reading). When you think you are close, fine tune using the white and yellow needles. Look for maximum white and minimum yellow. If you get a lot of red / green difference, your reference level may be be out of tune. If your deck has recorded a lot of tapes while azimuth was not spot-on, your pre-recorded tapes may sound dull. If you don’t have playback azimuth adjustment (Dragon, CR7 or cassette deck 1, among others), you should seriously consider leaving your head slightly misaligned so most tapes sound fine. If you intend to do so, play a pre-recorded tape, and adjust azimuth “by ear” until you get the best treble performance.
It is very important to repeat these last adjustments (PH height and azimuth), as they are always complementary. At least 2 or 3 iterations until perfect alignment!
Record head height and azimuth adjustment: Only for 3-head machines. Load a Type IV metal tape (ideally a reference Nakamichi tape, but most will do fine). Check your service manual for details. Record-play the 1KHz tone, at about 0dB level, and monitor the recorded signal. Adjust RH height to obtain maximum levels on the PPM, and minimum signal difference (yellow). When done, record-play the 15KHz tone, adjust to aprox -20dB, and proceed to adjust RH azimuth screw until you get maximum levels on the PPM, and minimum signal difference (yellow). Repeat both head height and azimuth adjustments.

